Backing Up TFS 2010 Using PowerShell: Part 2
In my previous post (“Backing Up TFS 2010 Using PowerShell: Part 1”) I covered how to backup up the TFS SQL Server databases using Windows PowerShell and the SQL Server Management Objects (SMO) API. In this post I’m going to take it one stage further and add another layer of backup for the paranoid amongst you like me.
Backing up the databases is all well and good but I like to be able to see what I’m backing up too and there’s nothing quite like being able to see all your data on disk in its native format. So to give me this extra warm fuzzy feeling I have written a PowerShell script to perform a ‘Get-Latest’ of all the source code in my ‘Team Project Collection’ in TFS and then copy those latest file versions to a backup location. By scheduling this activity to occur periodically through the week I see two key benefits. Firstly I can see that I have the data in a second place and that its in its native format (i.e. just plain files of source code, documents, images etc) which I can then backup and know that should I not be able to restore the SQL databases I will at least have the latest source files. The second benefit is that I have the ability to quickly access my source code (on the local machine or remotely) from another machine that may not have Visual Studio installed. This is useful if I just want to check something out and don’t need to modify the files.
I wanted this script to run on the server (in my case a Windows Home Server) and so to be able to perform a Get-Latest on TFS I needed to install ‘Team Explorer’ and setup a ‘Workspace’. Team Explorer is the standalone client required to interact with TFS Source code without Visual Studio. The Team Explorer setup package is included on the TFS installation media in the TeamExplorer folder. Browse to this and then run Setup.exe and keep the default values. This installs the Visual Studio 2010 shell, the TFS object model, Visual Studio Team Explorer 2010 and MS Help Viewer.
Next you need to setup a Workspace for the server using Team Explorer (via Start > All Programs > Microsoft Visual Studio 2010 > Microsoft Visual Studio 2010) and access the TFS server by adding the server in the normal way and go to ‘source control’. Select the top item in source control (in most cases ‘SERVERNAME\DefaulCollection’) and right click, “Map to local Folder”. Enter path of local folder on server and then it will ask if you want to get latest, say yes. You now have a workspace set up and you will be able to perform a manual or automated ‘Get-Latest’.
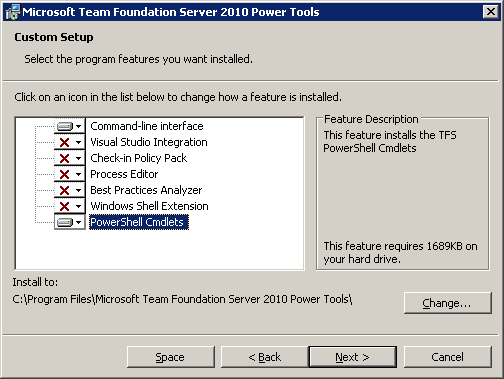
To automate the interaction with TFS and perform the ‘get’ you could use the TF.exe command line tool that installs with the Team Explorer setup. Personally as a PowerShell fan I’ chose to use the PowerShell cmdlets that come with the Team Foundation 2010 Power Tools. To use these you’ll need to download the power tools and run the tfpt.msi installation package. Choose custom and just choose the server specific items, in this case just the PowerShell cmdlets and the command line interface options (see screenshot).
The basic flow of the script is configure the file paths required, import the Microsoft.TeamFoundation.PowerShell snap-in/module, and then call the ‘Update-TFSWorkspace’ cmdlet. This is the command to perform a Get-Latest on the workspace previously configured. The workspace folder you specify must match the local folder you specified earlier in Team Explorer. The next step is to use Robocopy to copy the files to the backup location. Robocopy is a superb file copy tool as it only copies changed files which significantly improves the speed of this procedure compared to using a standard file copy cmdlet. Once complete the log is passed to RoboCopyLogger (more about this in a future blog post) that scans the log for errors, and then we add an Event Log entry for success or failure.
Finally set up a Scheduled Task to configure this script to run automatically each week. If you were to use this script as is you would need to change the file paths, and use an Event Log Source that was relevant to your system (or just remove the Write-Eventlog call”).
1
2
3
4
5
6
7
8
9
10
11
12
13
14
15
16
17
18
19
20
21
22
23
24
25
26
27
28
29
30
31
32
33
34
35
36
37
38
39
40
41
42
43
44
45
46
47
48
49
50
51
clear-host
write-output "------------------------------------Script Start------------------------------------"
write-output " TFS Data Get-Latest Backup "
write-output "------------------------------------------------------------------------------------"

# set file paths
$LocalWorkspaceFolder="c:\tempcode\tfsbackups\latestdata"
$RemoteBackupFolder="\\WinHomeSvr\Backup2\TFSBackups\LatestData"
$Robocopy="c:\scripts\Robocopy.exe"
$timestamp = Get-Date -format yyyyMMddHHmmss
$Log="c:\Scripts\Logs\TFSData\TFSLatestDataBackup_$timestamp.txt"
$RobocopyLogger="c:\Scripts\RoboCopyLoggerTweet_BETA\RobocopyLoggerTweet"

# set error action preference so errors stop and the trycatch kicks in
$erroractionpreference = "Continue"

try
{
    # add the TFS snapin to the session
    add-pssnapin Microsoft.TeamFoundation.Powershell

    # get latest on the top level workspace level
    Update-TfsWorkspace $LocalWorkspaceFolder -Force -Recurse

    # now robocopy the local cache to the final backup folder
    invoke-expression "$Robocopy $LocalWorkspaceFolder
                                        $RemoteBackupFolder /MIR /LOG:$Log /NP"

    # Copy the log files too
    invoke-expression "$Robocopy $Log $RemoteBackupFolder /MIR"

    # Check the log for errors etc and log to eventlog/twitter
    invoke-expression "$RobocopyLogger $Log 1"

    # write all events to the logs
    write-output "Writting SUCCESS to EventLog"
    write-eventlog -LogName "HomeNetwork" -Source "TFS Backups"
                              -EventId 1 -Message "TFS Data BackUp Script ran"
}
catch
{
    # error occurred so lets report it
    write-output "ERROR OCCURRED" $error

    # write an event to the event log
    write-output "Writting FAIL to EventLog"
    write-eventlog -LogName "HomeNetwork" -Source "TFS Backups"
                               -EventId 1 -Message "TFS Data BackUp Script failed" -EntryType Error
}

write-output "------------------------------------Script end------------------------------------"
